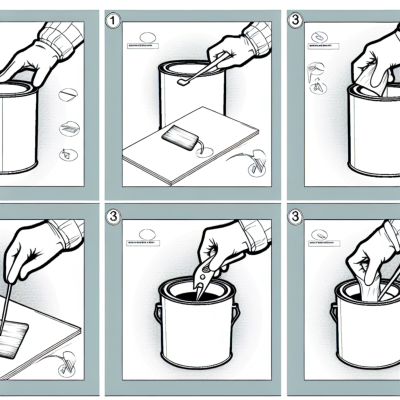
Opening a can of paint doesn't require fancy tools - with some clever tricks, anyone can learn how to open paint cans using common household items. All it takes is a sturdy screwdriver or makeshift paint can opener like a spoon handle to pry the lid open. With the right amount of applied pressure and working around the rim, the sealed can of paint will release its contents, allowing painters to commence their colorful projects. Master this simple can opening skill and tackling a sealed tin of paint will no longer be a frustration.
Opening a paint can may seem like a simple task, but for those who have struggled with it, it can be quite frustrating. Whether you are a professional painter or a DIY enthusiast, knowing how to open a paint can properly is essential to ensure a smooth and successful painting project.
Step 1: Gather the right tools
Before attempting to open a paint can, it is important to have the right tools on hand. You will need a sturdy screwdriver or paint can opener, a rag or paper towel, and a hammer (optional). These tools will help you to easily pry open the can and remove any excess paint from the lid.
Step 2: Prep the can
Before opening the paint can, it is important to ensure that the lid is clean and free from any dirt or debris. Use a rag or paper towel to wipe away any dust or dirt that may have accumulated on the lid. This will help to prevent any unwanted particles from falling into the paint when you open the can.
things to do as a couple
Step 3: Open the can
Using a screwdriver or paint can opener, carefully insert the tool into the groove between the lid and the can. Apply slight pressure and slowly work your way around the lid, prying it open. If the lid is particularly stubborn, you can use a hammer to gently tap the tool into the groove, loosening the lid.
Mastering the art of opening paint cans may take some practice, but with the right tools and technique, it can become a seamless part of your painting process. By following these simple steps, you can ensure that your paint cans are opened easily and without any spills or mess.
Techniques for Opening Paint Cans Effectively
Opening paint cans can sometimes be a challenging task, especially if you don't have the right technique. Here are some effective techniques that can help you open paint cans easily and without any hassle.
1. Use a Proper Paint Can Opener: The first and most important technique is to use a proper paint can opener. A paint can opener is designed specifically to open paint cans without damaging the lid or spilling the paint. It has a hook at one end that fits under the lid of the can, allowing you to pry it open easily. Make sure to invest in a good quality paint can opener for best results.
2. Tap the Lid with a Hammer: If you don't have a paint can opener, you can use a hammer to open the can. Gently tap the lid all around the edges with the hammer to loosen it. Be careful not to hit too hard as it can dent the lid or cause the paint to spill. Once the lid is loosened, use a screwdriver or a similar tool to pry it open.
3. Use a Flathead Screwdriver: Another technique is to use a flathead screwdriver. Insert the screwdriver into the groove between the lid and the can and twist it to pry open the lid. Make sure to apply even pressure to avoid any damage to the lid or the can. This technique may require a bit of strength, so be careful while using it.
4. Use a Pair of Pliers: In case the lid is stuck and none of the above techniques work, you can try using a pair of pliers. Grip the lid firmly with the pliers and twist it to loosen it. Once it's loosened, you can use your hands or a tool to completely remove the lid.
Remember to always exercise caution while opening paint cans to avoid any accidents or injuries. It's also a good idea to wear gloves to protect your hands from any sharp edges. With these techniques, you'll be able to open paint cans effectively and efficiently.
What to do before opening a can of paint?
Before you crack open that can of paint, it's important to take a few preparatory steps to ensure a smooth and successful painting experience. Here are some important tasks to complete before you start painting:
- Clean the surface: Make sure the surface you plan to paint is clean and free of any dirt, dust, or grease. Use a mild detergent and water to wash the surface, and allow it to dry completely before moving on to the next step.
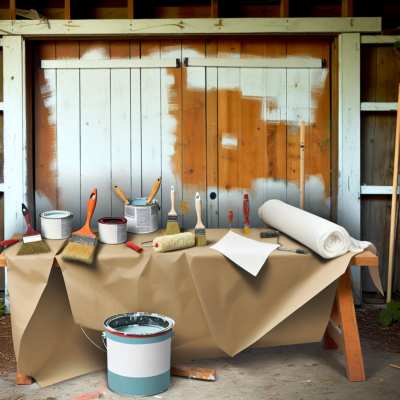
- Prepare the tools: Gather all the necessary painting tools, such as brushes, rollers, trays, and drop cloths. Make sure your brushes and rollers are clean and in good condition. If needed, remove any dried paint from the brushes or rollers before using them.
- Protect the surrounding area: Cover any nearby furniture, floors, or fixtures with drop cloths or plastic sheets to protect them from accidental paint splatters or spills.
- Read the instructions: Before opening the paint can, carefully read and follow the instructions provided by the manufacturer. This will ensure that you understand any specific requirements or recommendations for the paint you are using.
- Mix the paint: If the paint has been sitting for a while, it may have separated or settled. Before opening the can, gently stir the paint with a stir stick or a paint mixer to ensure that all the ingredients are thoroughly mixed.
- Open the can carefully: Use a paint can opener or a screwdriver to remove the lid of the paint can. Be careful not to damage the lid or the can while opening it.
By following these steps, you can ensure that you are well-prepared and ready to begin your painting project. Taking the time to properly prepare before opening a can of paint will help you achieve professional-looking results.
How do you open a tin of paint without damaging it?
Opening a tin of paint without damaging it requires some finesse and careful handling. Here are some tips to help you successfully open a tin of paint without causing any damage:
1. Use a proper paint can opener: Invest in a good quality paint can opener that is specifically designed for this purpose. These openers have a curved edge that easily fits under the lid and allows for a clean, controlled opening.
2. Clean the lid: Before opening the tin, make sure the lid is free from any dirt or debris. Use a clean cloth or paper towel to wipe off any dust or paint drips that might interfere with the opening process.
3. Tap the lid: Gently tap all around the lid with a rubber mallet or the back of a screwdriver. This will help break the seal and loosen the lid, making it easier to open.
4. Use leverage: Once the seal is loosened, place the paint can opener under the lid and apply gentle pressure to lift it up. Avoid using excessive force as it can dent or bend the lid.
5. Avoid using sharp tools: It's important to refrain from using sharp tools like knives or screwdrivers to pry open the tin. These tools can damage the lid and increase the risk of injury.
6. Store the paint properly: After opening the tin, be sure to securely close the lid to prevent the paint from drying out. Use a rubber mallet or a wooden block to gently tap the lid back into place.
By following these steps, you can open a tin of paint without damaging it and ensure that it remains in good condition for future use.
Exploring Different Types of Paint Cans and Their Lids

When it comes to opening paint cans, it's important to understand that not all cans are created equal. Different types of paint cans have different lids, and mastering the art of opening each one is essential for any DIY enthusiast or professional painter.
There are several common types of paint cans and lids that you may come across:
how to get sunscreen out of fabric
1. Screw-Top Cans: These cans have a metal lid with a threaded opening. To open them, simply twist the lid counterclockwise until it comes off. This type of lid is easy to use and provides a secure seal, preventing paint from drying out.
2. Pry-Off Cans: These cans have a metal lid that is sealed with a strong adhesive. To open them, you'll need a paint can opener or a flathead screwdriver. Insert the tool under the lid's edge and gently pry it up. Be careful not to damage the lid or spill any paint in the process.
3. Snap-On Cans: These cans have a plastic lid that snaps onto the can's rim. To open them, locate the tab on the lid and pull it up. The lid will release and can be easily removed. Snap-on lids are convenient but may not provide as tight of a seal as other types of lids.
4. Twist-Off Cans: These cans have a plastic lid that twists off. To open them, grip the lid firmly and twist it counterclockwise until it comes off. Twist-off lids are commonly found on smaller paint cans and are easy to use.
Remember, always use caution when opening paint cans to avoid injury or spills. If you're unsure of how to open a particular can, consult the manufacturer's instructions or seek advice from a professional.
By familiarizing yourself with the different types of paint cans and their lids, you'll be better prepared to tackle any painting project with confidence and ease.
how many fixer upper families still live in their homes
How many different types of paints are there?
When it comes to paint, there are numerous different types available on the market. Each type of paint is designed for specific applications and has its own unique properties. Here are some of the most common types of paint:
1. Latex paint: Also known as water-based paint, latex paint is one of the most popular types of paint. It is easy to use, dries quickly, and can be easily cleaned up with water. Latex paint is commonly used for interior walls and ceilings.
2. Oil-based paint: Oil-based paint is known for its durability and resistance to wear and tear. It provides a smooth and glossy finish, making it ideal for wood and metal surfaces. However, oil-based paint has a strong odor and takes longer to dry compared to latex paint.
3. Acrylic paint: Acrylic paint is a versatile type of paint that can be used on various surfaces, including canvas, wood, and metal. It is known for its fast-drying properties and ability to retain vibrant colors. Acrylic paint can be thinned with water or mixed with other mediums to achieve different effects.
4. Chalk paint: Chalk paint is a decorative paint that is commonly used for furniture and other home decor projects. It has a matte finish and can be easily distressed to create a vintage or shabby chic look. Chalk paint is often favored for its ease of use and ability to adhere to different surfaces without the need for priming or sanding.
5. Spray paint: Spray paint is a convenient option for covering large areas or achieving a smooth and even finish. It is available in a wide range of colors and finishes, including matte, gloss, and metallic. Spray paint is commonly used for automotive, DIY, and outdoor projects.
6. Epoxy paint: Epoxy paint is a highly durable and resistant paint that is commonly used for industrial and commercial applications. It creates a hard and protective coating that is resistant to chemicals, abrasion, and moisture. Epoxy paint is commonly used for garage floors, countertops, and other surfaces that require a high level of durability.
These are just a few examples of the different types of paints available. Each type of paint has its own unique characteristics and is designed for specific purposes. Choosing the right type of paint for your project can ensure the best results and long-lasting finish.
What are paint cans called?
Paint cans, also known as paint tins or paint containers, are cylindrical containers used for storing and transporting paint. They are typically made of metal, such as tin or steel, although plastic paint cans are also available.
The term 'paint cans' refers to the general category of containers used for paint, while 'paint tins' specifically refers to metal cans. These cans usually have a removable lid that can be sealed to keep the paint fresh and prevent spills. Plastic paint containers, on the other hand, often have a screw-on lid or a snap-on lid for easy opening and closing.
Paint cans come in various sizes, ranging from small cans for sample paints or touch-ups to large cans for industrial or commercial use. The most common sizes are 1 gallon (3.78 liters) and 5 gallons (18.93 liters), but smaller and larger sizes are also available.
In addition to storing paint, paint cans can also be used for other purposes, such as storing solvents, varnishes, or other liquid products. They are designed to be durable and leak-proof, ensuring that the contents are well-preserved and can be safely transported.
When opening a paint can, it is important to use the proper tools, such as a paint can opener or a flathead screwdriver. This helps prevent damage to the can and ensures that the lid can be securely resealed after use.
In conclusion, paint cans are essential for the storage and transportation of paint and other liquid products. They come in different sizes and materials, and can be opened and sealed using specific tools. Proper handling of paint cans is important to ensure the longevity of the paint and prevent any spills or leaks.
DIY Solutions for Opening Cans at Home
Opening cans at home can sometimes be a challenge, especially if you don't have the right tools. However, with a little creativity and resourcefulness, you can find DIY solutions to open cans easily. Here are some ideas:
| DIY Solution | Materials Needed | Instructions |
|---|---|---|
| Using a Screwdriver | - Screwdriver - Hammer | 1. Place the tip of the screwdriver on the edge of the can lid. 2. Use a hammer to gently tap the handle of the screwdriver, creating a small hole. 3. Repeat this process in a circular motion around the lid until it can be easily removed. |
| Using a Knife | - Sharp knife - Cutting board | 1. Place the can on a stable surface, such as a cutting board. 2. Carefully insert the tip of the knife into the space between the lid and the can. 3. Apply pressure and slowly move the knife around the lid to loosen it. 4. Once the lid is loose, lift it up and remove it. |
| Using a Spoon | - Spoon - Hammer | 1. Hold the spoon upside down, with the handle pointing towards the can lid. 2. Position the edge of the spoon's handle on the edge of the lid. 3. Use a hammer to gently tap the handle of the spoon, creating a small hole. 4. Continue tapping around the lid until it can be easily lifted off. |
Remember to exercise caution when using these DIY solutions. Always ensure that you are using the tools safely and responsibly. Additionally, be mindful of the contents of the can, as they may be under pressure or have sharp edges. With these DIY solutions, you'll never struggle to open a can again!
What can I use to open a paint tin?
Opening a paint tin can sometimes be a challenging task, especially if you don't have the right tools on hand. However, there are several common household items that you can use to open a paint tin without any hassle.
One of the most common tools used to open a paint tin is a flathead screwdriver. This versatile tool can easily fit into the groove of the paint can lid and be used to pry it open. Make sure to use a screwdriver with a sturdy handle to avoid any accidents.
If you don't have a screwdriver, you can also use a paint can opener. This specialized tool is designed to open paint tins and has a curved shape that fits perfectly under the lid's edge. Simply insert the paint can opener into the groove and lift the lid to open the tin.
In a pinch, you can even use a butter knife or a coin to open a paint tin. Insert the knife or coin into the groove and apply gentle pressure to lift the lid. However, be cautious when using these items, as they may not be as effective or safe as dedicated paint can openers or screwdrivers.
888 angel number
Remember to always exercise caution when opening a paint tin to avoid any injuries. Wear protective gloves to protect your hands and be careful of any sharp edges on the can or lid. With the right tools and a bit of patience, you'll be able to open a paint tin with ease.
How do you open a tight paint can?
Opening a tight paint can can be frustrating, but with the right technique, it can be a breeze. Here are a few tips to help you open a tight paint can:
- Start by ensuring that you have a sturdy paint can opener. This tool is specifically designed to open paint cans and will make the process much easier.
- Place the paint can on a stable surface, such as a workbench or the ground. Make sure it is secure and won't tip over.
- Inspect the rim of the paint can for any dried paint or debris. Use a clean cloth or scraper to remove any obstructions, as they can make it harder to open the can.
- Insert the paint can opener under the lid, positioning it at the edge of the can's rim. Apply downward pressure and push the opener towards the lid to create a small opening.
- Once you have created a small opening, move the opener along the rim of the can, gradually prying the lid away from the can. Be careful not to apply too much force, as this can cause the paint to spill.
- If the lid is still difficult to remove, you can tap it gently with a rubber mallet or a wooden block. This can help loosen the seal and make it easier to open.
- Once the lid is partially open, you can use your fingers to grip the edge and lift it fully. Be cautious as you lift the lid, as there may still be some residual paint on it.
By following these simple steps, you can easily open a tight paint can and get started on your painting project without any hassle. Remember to always wear protective gloves and eyewear when working with paint to ensure your safety.
In summary, opening a sealed can of paint is made easy with some simple tools and techniques. Using a screwdriver or improvised paint can opener , anyone can learn to open paint cans of all types, from pry-off lids to twist caps. With practice, popping open a fresh or stuck can of paint becomes second nature. So don’t let an unopened can slow down your painting project - arm yourself with a stiff screwdriver and master the can opening basics to easily access that vibrant new color.
Read more:
- How to paint aluminium
- mdf paint
- how to get slime out of clothes
- how to get rid of paint smell
- how to get water out of iphone
- pinata ideas
- how to get sunscreen out of fabric
- things to do in summer
- washing soda vs baking soda
- paint peeling in bathroom
- paint for upvc doors
- mould resistant paint
- painting after removing wallpaper
- things to do as a couple
- sandpaper grades
- baking soda and vinegar cleaning
- how to hack key fob doors apartment
- how to paint a garage door
- can you paint laminate floors
- oil based paint for walls
- what is emulsion paint
- how to clean gloss paint brushes
- laundry detergent substitute
- how to antique a mirror
- how to get a bird out of your house
- how to remove rust from stainless steel
- how many fixer upper families still live in their homes
- apple tablet with pen
- how to clean white fabric shoe
- painting pine furniture
- how to test for lead paint
- top selling vintage items on etsy
- best places to live in texas
- The Magnificent Waco Castle
- how to balance a ceiling fan